 Save to Pinterest
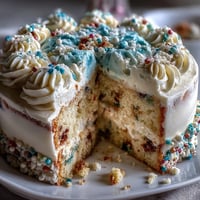
 My friend texted me a photo of her cap and gown exactly one week before graduation, and I knew right then what I wanted to bake. There's something about a sheet cake that feels both humble and grand at the same time, especially when you pipe buttercream roses across the top like you're decorating a garden instead of frosting dessert. The first time I made this, I was honestly nervous about the piping—my hands aren't naturally steady—but something about the repetition of making each rose actually calmed me down. By the time I finished, the cake had become this beautiful thing we could all gather around and celebrate with.
I made this cake for my coworker's daughter last spring, and watching a shy nineteen-year-old's face light up when she saw her name written in buttercream on top reminded me why I love baking for milestones. Her mom kept saying it was too pretty to eat, but we cut into it anyway, and the vanilla cake was so soft it practically melted on the fork. That's when I realized the decoration is really just the wrapping paper—the actual gift is the moist, buttery cake underneath.
Ingredients
- All-purpose flour (3 cups): This is your structure—measure it carefully by spooning into the cup and leveling it off, because packing flour down will make your cake dense and heavy.
- Baking powder and baking soda (2½ tsp and ½ tsp): These two work together to give you a tender crumb with a slight rise, so don't skip either one or substitute randomly.
- Salt (½ tsp): A pinch of salt sounds tiny, but it rounds out the sweetness and makes the vanilla flavor pop.
- Unsalted butter (1 cup for cake, 1½ cups for buttercream): Room temperature is non-negotiable here—cold butter won't cream properly and you'll end up with a dense cake and grainy frosting.
- Granulated sugar (2 cups): This creams with the butter to create tiny air pockets that make the cake light and fluffy.
- Eggs (4 large, room temperature): Cold eggs won't incorporate smoothly, so pull them out of the fridge while you're prepping everything else.
- Vanilla extract (1 tbsp for cake, 2 tsp for buttercream): Use real vanilla, not imitation—the flavor difference is noticeable when it's the main flavoring.
- Whole milk (1¼ cups for cake, ¼ cup for buttercream): Room temperature milk blends seamlessly into the batter instead of creating pockets of coldness.
- Powdered sugar (6 cups, sifted): Sifting removes lumps before you start, which saves you frustration when beating the buttercream.
- Gel food coloring (assorted colors): Gel is thicker than liquid coloring, so it won't thin out your buttercream or turn it watery.
Tired of Takeout? 🥡
Get 10 meals you can make faster than delivery arrives. Seriously.
One email. No spam. Unsubscribe anytime.
Instructions
- Set the stage:
- Preheat your oven to 350°F and get your 12x18-inch pan ready with parchment paper—this prevents sticking and makes cleanup honest work instead of a battle. Grab all your ingredients and set them on the counter to come to room temperature, because this matters more than you'd think.
- Mix the dry ingredients:
- In a medium bowl, whisk together the flour, baking powder, baking soda, and salt until they're evenly distributed. This pre-mixing is your insurance policy against lumps hiding in the finished cake.
- Cream the butter and sugar:
- In a large bowl using an electric mixer, beat the room-temperature butter and sugar together for 3 to 4 minutes until the mixture is pale and fluffy—it should look almost like mousse. This creaming step is where the magic happens; you're literally whipping air into the cake.
- Add the eggs one by one:
- Drop in one egg, beat it in completely, then repeat with the remaining three eggs. After the last egg is mixed in, add the vanilla and beat for another minute until everything is smooth.
- Build the batter gently:
- Now you alternate: add about a third of the flour mixture, beat briefly, add half the milk, beat briefly, add another third of flour, beat, add the remaining milk, beat, then add the last of the flour. The key is restraint—mix just until combined, because overmixing develops gluten and toughens the cake.
- Bake with patience:
- Pour the batter into your prepared pan and smooth the top with an offset spatula. Bake for 30 to 35 minutes until a toothpick inserted in the center comes out clean or with just a few moist crumbs clinging to it.
- Let it rest:
- Cool the cake completely in the pan on a wire rack before frosting—rushing this step is how you end up with buttercream sliding off warm cake.
- Make the buttercream:
- Beat room-temperature butter until creamy, then gradually add the sifted powdered sugar a cup at a time, scraping down the bowl as you go. Add the milk and vanilla, then beat for another 5 minutes until the frosting is fluffy enough to hold peaks.
- Divide and color:
- Spoon buttercream into separate bowls and tint each one with gel coloring—use pink and red for roses, yellow for flower centers, green for leaves, and leave some white for the base layer. The gel coloring won't thin out the frosting like liquid would.
- Create the base layer:
- Spread a thin, even layer of white buttercream across the cooled cake using an offset spatula—this is your canvas and anchor for the piped decorations.
- Pipe the roses and leaves:
- Fit piping bags with petal tips for roses and leaf tips for leaves, fill with your colored buttercream, and pipe generously across the cake focusing on corners or creating a beautiful border. Don't worry about perfection; the roses don't need to look like florist work, just genuine and celebratory.
- Add the personal touch:
- Using a small round piping tip, write your graduation message or the graduate's name directly on the cake in a color that contrasts nicely with the base.
 Save to Pinterest
 There's a quiet moment that happens right after you finish the last rose, when you step back and look at what you've created and it actually looks like something from a bakery case. I've learned that this cake is less about showing off and more about saying with sugar and butter, I see this milestone, I'm celebrating you, you made it. That's worth piping a few roses for.
Making the Buttercream Smooth and Fluffy
The secret to cloud-like buttercream is beating it longer than feels necessary—those 5 minutes aren't a suggestion, they're the difference between frosting that feels grainy and frosting that feels like silk. I used to rush this step, and my cakes looked fine on the outside but the frosting had a slightly gritty texture that nobody could quite place. Once I committed to the full beating time and added the milk slowly while the mixer was running, everything changed. Now when people taste the frosting, they always comment on how smooth it is, which feels like the best possible compliment.
Piping Roses Without Panic
The first rose never looks like a rose—it looks like a blob with squiggles, and that's completely normal. By the tenth rose, your hand has figured out the motion and the timing, and suddenly you're making actual flowers. The petal tip creates natural-looking folds if you let it; you don't need to be precise, just consistent with your pressure. I've found that practicing on parchment paper first, then scraping off and reusing the frosting, takes away all the pressure of the actual cake.
Storage and Variations
This cake keeps beautifully at room temperature for a couple of days, covered loosely so the frosting doesn't dry out, and refrigeration extends it to about five days. If you want to ring the changes, you can substitute three-quarters of a cup of unsweetened cocoa powder for the same amount of flour for a chocolate cake that still stays moist and tender. A few friends have asked me about making this vegan or gluten-free, and while those swaps require more planning, the classic version remains my go-to because it never disappoints.
- Keep the cake covered after the first day so the buttercream doesn't absorb odors from the fridge.
- If you're making this ahead, frost it the morning of serving so the piping stays defined and beautiful.
- Pair this with something crisp and cold—sparkling lemonade, iced tea, or even champagne if the celebration calls for it.
 Save to Pinterest
 Making a graduation cake is really about acknowledging that someone you care about did the hard thing and came out the other side. This recipe exists because celebration deserves more than just store-bought, and you're clearly the kind of person who understands that.
Recipe FAQs
- → What ingredients create the moist texture in this cake?
The combination of butter, eggs, and whole milk contributes to the cake’s tender and moist crumb.
- → How is the buttercream frosting prepared?
Butter is beaten until creamy before gradually adding sifted powdered sugar, milk, and vanilla for a smooth, fluffy consistency.
- → What techniques are used to decorate the cake with roses?
Colored buttercream is piped using petal and leaf tips to form detailed roses and foliage across the cake's surface.
- → Can this cake be customized with different flavors?
Yes, a chocolate variation can be made by substituting some flour with unsweetened cocoa powder.
- → How long can leftovers be stored safely?
Store covered at room temperature for up to 2 days or refrigerate for up to 5 days to maintain freshness.